Monday, October 19, 2020

Look Micro-routine Recap

In the ELA Department's most recent PLG we examined a couple Micro-routines for Literacy put out by New Vision for Public Schools.  One appealing feature of these routines, which have been adapted specifically for remote instruction, is that they are intended to take a short amount of time and have very few steps. As I've been sharing micro-routines with teachers in and out of the ELA department, I sense a healthy amount of skepticism from teachers about the actual amount of time these routines would take. While it is within our control and discretion to adjust the timing to suit our students, I also see the value in keeping to these time frames. 

For one, we know that everything (everything!) seems to take longer in the remote classroom. I wonder if sticking to the brief time limits of these micro-routines could actually be a way to increase efficiency. If we incorporate the routine frequently enough,  students' ability to respond within the time frames may increase. 

Another benefit to sticking closely to the allotted time is that even if things feel like they're going poorly, the routine only lasts for 6-ish minutes. When we think about the UDL concept of varying demands and resources, one really interesting way to create a reasonable challenge for students is to play with time. If they run out of details to share or feel confused about the image you're using in this routine, they know each step of the routine will only last for two minutes and they won't be struggling for an undetermined length of time.

WHY  include the Look routine? 

  • To provide multiple representations of ideas and concepts students are studying
    • when using images/art specifically, to provide an alternative to print text.
  • To provide opportunities for students to observe closely and identify specific details
  • To pique students' curiosity about something they will read more about or extended their thinking about a topic they've already read about.
  • To increase students' comfort and confidence in speaking out loud and sharing with the class
    • Naming specific details students have observed seems like a low-risk, high reward opportunity for student participation

HOW I might implement Look:
(Ideas that follow assume that the routine has been introduced and practiced with familiar content and students are familiar with the routine).

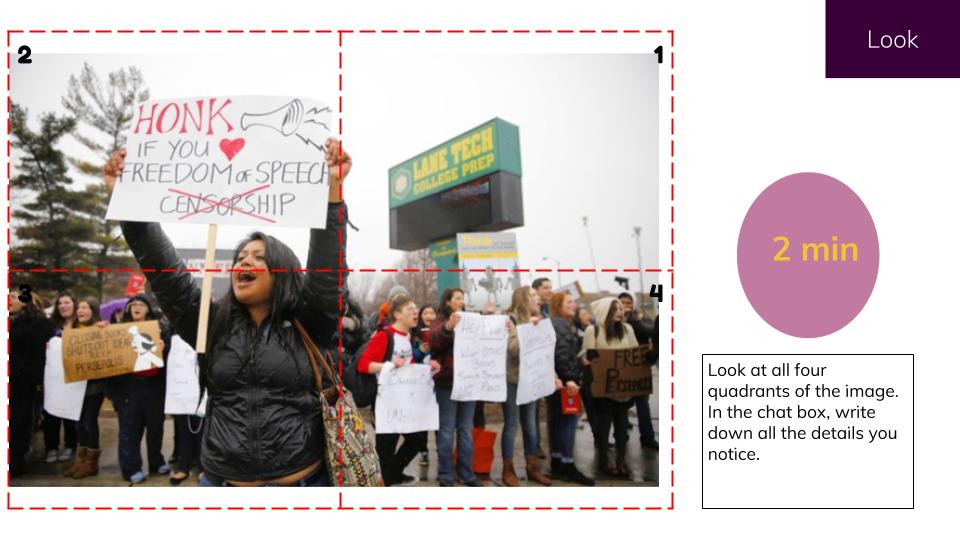
  • Choose an interesting image that connects in some way to a thematic idea of a text students will be reading in ELA class.
  • Display the image for students and allow them 2 minutes to look closely at the image and use the CHAT  to record as many details as they notice in the quadrants. Give students 2 minutes to share out loud the details they find to the most interesting in the quadrants (as outlined in the slides example we looked at). 
  • Repeat the Look process with a second related image. There are a few possible approaches I can imagine for this.
    • If your students are efficient with breakout rooms this could be a way for students to engage in the Look routine in a much smaller group.  When students return to the whole group (after 4 min), each group could share out the most interesting details they discussed.
    • We discussed the possibility of assigning students different quadrants to focus on and share out with the class. This could be done by displaying a list of student names in a grid on the slide (pictured below). Assigning students to specific quadrants could help limit the amount of students entering in the chat at once in the first part of the routine.
  • Pair these images with a short excerpt from the anchor text students are reading. After students have examined and discussed ideas in one or two images, provide them with a short reading excerpt that examines some of the ideas reflected in the images. Students could complete the reading semi-synchronously annotating for a specific reading focus. For example, after examining the two images about "courage" students could read an excerpt from Number the Stars. A possible reading focus could be to identify evidence in the excerpt that reveals a character's courage. (RL 6.1 citing evidence and RL 3 character's reaction). Students could complete a reading in pairs, small groups, or independently depending on how the teacher wanted to structure this.
  • Return whole group and have students share examples of the textual evidence they cited. Examples could be shared by cold-calling on several students, asking students to agree, disagree, or add-on to a peer's response. Students could type evidence in the chat, but if they've also completed a Google Doc with annotations, sharing in the chat may not be worth the time.
  • Possible Exit Tickets: Use a Google Form and ask students to share an interesting observation they heard a classmate share today. Ask students to explain which of the two images they think best pairs with the excerpt they read. Students will have to pull evidence from both texts in order to explain thoroughly (RL 6.1).

Below are some examples that I compiled should anyone want to incorporate this routine into an upcoming lesson. Each of the images align with a thematic idea explored in each of the Trimester 1 Anchor Texts for grades 6-8. 

Grade 6 Examples for the thematic idea of courage. Number the Stars


Grade 7 Examples for the thematic idea of empathy. Walk Two Moons

Grade 8 Examples for the thematic idea of censorship. Fahrenheit 451


One of the groups also discussed the idea of concealing some of the quadrants in the beginning of the routine and to slowly reveal each quadrant so the students could see the image being pieced together. This was an easy adjustment to the slide by simply adding filled-in shapes and covering up the quadrants 2-4. The video below shows an example of the "slow reveal" version of Look. 

For anyone interested in using the images they slides template is linked here. Please share additional ideas or experiences with the Look Micro-routine!


Tuesday, October 13, 2020

padlet for Recording Student Reading

One of the strangest parts of teaching remotely is not hearing the noise of student talk in classrooms, or sometimes students' voices at all. When meeting with the 6th grade ELA teachers from across the district last week, several of them brought up the concern of not being able to hear students read out loud very often. This was something I'd actually been thinking about over the summer when I was considering the many different ways in which we could use padlet for remote instruction.

padlet is a versatile tool because it allows students to express their understanding and learning in multiple ways. Students can type, draw, film or record themselves, and more.  Many students prefer to keep their cameras off, for a variety of legitimate reasons, but the film recording is one option for students who don't mind showing their faces but need to find the right time and place to have a distraction-free environment. The audio recording feature has good appeal as a way to keep in touch with what students are reading and to hear how they are reading.

I envisioned  just a few possible ways this could be organized, but of course there are many more possibilities. 

1. Teacher-created: Create a padlet using the "Grid" or "Wall" format for the page. Ask students to create a post in which they include their name, the title of the book they're reading, and a page number. Student can then click the three dots icon to produce the dropdown and select the purple "Voice" icon.  This allows students to record themselves for up to 15 minutes. Although they shouldn't need that much time it's nice to know a slower reader won't be cut off before finishing their page. I created an example padlet like this and set it so that I could both add a comment and give a "grade" is this was something I were scoring or tracking. Even if I were not going to give a score to these recordings, I'd still keep the comment feature open so I could provide feedback. Here is a link to the example padlet with an example student post. One drawback to having all students post to this same padlet is that they would all be able to hear each other's recordings. While it might be nice for students to see the books their peers are reading, I can also see why this might not be desirable so I started brainstorming other ways I might organize this. 

2. Teacher-created & Organized: Create a padlet using the "Shelf" format for the page, which will allow you to have student recordings organized in whatever system makes sense for you. In the example, I created columns by month because I thought it would be a nice way for students to collect their progress across the year. The brief video below shows how to set up this padlet, with comments, grading and the Require Approval Setting. By requiring post approval, none of the students' post will be visible on the public padlet until you listen and give your approval. This is a way to to limit students listening to each other's posts if you are concerned about that. 

After all students have submitted a post, you could also go in and create a password for the padlet so that students cannot go back and look at the padlet until or if you give them the password.

3. Student-created: If you wanted students to create their own padlets to recording their reading there are a couple of easy steps. First, students need to create their own padlet accounts. This is free and easy to do by visiting this link. Second, you would could show students how to create their own padlet OR you can set up a template for how you want it organized and ask them to create a REMAKE of the template. By copying the format and the posts, students will have a ready-made padlet for them to begin recording their reading. The video below shows how to create Remake of an existing padlet. Note, students must have their own padlet account in order to create a Remake.


Reading out loud to our students whether during live lessons or in pre-recorded videos during independent work is a great way to continue exposing students to model fluent readers. It's also important for us to hear how students are progressing in their reading especially since they may not have as many opportunities to practice reading while at home. padlet is just one tool that we can use to record and collect our student reading, as well as provide feedback. I'd love to hear how teachers are using this and other tools to stay connected to students' reading!


Monday, October 12, 2020

Exploring Close Reading Routines for Remote Learning

Planning for a once a week 60 minute PLG that is sandwiched in between four back-to-back teaching periods and a staff meeting on Friday afternoon sure does have my brain working overtime! My son has many times explained the sweet spot of the bat to me, and I think that's what I'm seeking with PLG. In order for PLG to feel like a "homerun" for all, it's important to find that balance of sharing resources and ideas without risking cognitive overload and shut down. As with our students, the truly difficult part of this is that everyone's threshold for shutting down varies! Overall, though, the majority of the group appreciated time to share successes and struggles with each other and also to explore a resource of their choice. 

Despite having to adjust our practice and potentially let go of many of the activities and materials we would use in a typical school year, close reading is a practice that will always be an important one for students. It was really nice to see the energy and enthusiasm of the discussion around close reading and the possible ways these strategies could be used with our students. 


The Annotation Routine for Remote Learning offered a framework that could be used repeatedly with different texts, for different purposes and in a variety of ways. In the example video, the teacher had a small number of students working in the same document and gave them a specific focus for their reading and annotation.  I appreciated the way she had her Google Doc set up with the Annotation Focus grid set in the Header and in the Footer she had sentence starters for how students might respond to their classmate's comments. 

I had shared this annotation routine with an 8th grade ELA teacher earlier in the week and she used it with a small excerpt of Fahrenheit 451. Logistically, there were a couple of things to consider when setting this up.
  1. To avoid the overwhelming and possibly distracting scenarios of 25+ students all highlighting and commenting in the same document,  she used breakout rooms and had those smaller groups use a single shared document for annotation. 
  2.  She had to group the students as well as create and post links to each of the breakout rooms in the slides.
  3.  For the close reading document itself, she had to create multiple copies of the same document and only assign it to specific students (according to how she had grouped them). This was one of those "little details" that could have been the difference between confusion and wasting time or having the class run smoothly! 
I was fortunate enough to join some of the breakout rooms and listen in as the students discussed the small excerpt of text. Students used the Annotation Guide at the top of the document to direct their conversation, especially when they were trying to decide what to highlight and comment about. The number of students in each group (4-5 max) was a really nice amount of students to allow for multiple voices as well as for a controlled number of readers highlighting and commenting in the document. 
                                                
 Annotation Routine, student example
Routine from New Visions for Public Schools

While certain groups needed more support than others, each group I visited was grappling with the text to some degree. Some students felt more comfortable highlighting the text only so I would either type in Chat or ask out loud if they highlighted that because the language grabbed their attention or because it revealed something about Montag (the annotation focus questions). Each time, the student was able to provide a reason for their highlighting. As a support, I inserted a comment, transcribed their explanation and attributed their name. I then encouraged them to go back and comment on other areas they had highlighted. 

This worked really well with the small group sizes created by the teacher. Also, she was asking them to annotate with a character and language focus that they had previously done together with a different excerpt from the novel. Apply a familiar annotation focus to a new piece of text allowed the students to draw on prior experiences with close reading.  I could also see using this format for a formative assessment with a new piece of text and produce a short written response. Alternatively, I could imagine assigning partners and having students first independently annotate their own document. After independent annotation, students could swap documents and respond to each other's annotations using comments. 

Three Reads Protocol from New Visions for Public Schools was another close reading approach that some of us explored in PLG. This was protocol was not specifically adapted for remote learning,  but I could easily see using this remotely in both a live lesson or as independent work. 

The purpose of the protocol is basically to have students focus in on a much smaller excerpt of a larger text and to read it at least three times, each for a different purpose. The explanation and examples of the Three Reads Protocol provide several different ways you might tweak the purposes for which students read. While you might have students read to Comprehend, Analyze, and Connect, you could change these purposes and have students read to focus on Vocabulary, the Main Idea, and Comprehension. The reading focuses you have for students can change depending on the goal, the complexity of the text, and the amount of scaffolding needed. 

I used the same excerpt from Fahrenheit 451 in the example below to show how I might use this protocol. This could be done in small groups with students working from the same document, highlighting and adding text to the blank boxes. The Three Reads Protocol could also be done independently, with students bring their notes to small group or whole group conversations. 

Example of Three Reads Protocol using Fahrenheit

As with any new routine, I'd model the Three Reads Protocol whole group so students could hear the thought process and see how to annotate.  The first time I asked students to use this protocol, independently or in small groups, I would probably choose a piece of text we'd already read once and ask them to read for purposes we'd previously done together in class. 

I look forward to seeing how these, and other close reading routines, get  incorporated into remote ELA classrooms! 


Sunday, October 4, 2020

Debriefing Hexagonal Thinking Discussion Strategy

In our most recent PLG time, our ELA department engaged in a discussion strategy in small groups through Google Meet. Hexagonal Thinking is a discussion strategy from Spark Creativity's Betsy Potash that I first came across after talking with a friend and colleague who had listened to the Cult of Pedagogy podcast. 


While there are many practices we'll have to reexamine to see if they still have place and purpose in our remote classrooms, giving students opportunities to engage in open-ended tasks that encourage critical thinking and discussion is something we should continue to prioritize. 


Here is a recap of some points from our Hexagonal Thinking Discussion debrief.
  • This seems like a good strategy for visual/spatial learners
  • It would be beneficial to build  in some independent think time before discussing in groups.
  • Groups may need some direction about how to decided how/who will move the terms. decide  Will one person be responsible for all the dragging or will everyone pitch in? I thought about this afterward, but I remember Potash discussing in the podcast that it interesting to see which natural roles students might fall into in this kind of work. I do actually like her point of valuing all types of contributions, but I can also see that especially in this new and strange remote classroom, assigning roles may be a helpful way to avoid additional awkward encounters. 
  • The first choice felt the hardest and like such an important one. Maybe explicitly calling this out for students would be helpful.
    • Perhaps pointing out parts of speech of words and let students start grouping in that way would help students  get started.
  • This activity could be done in a few ways.
    • As independent (asynchronous) pre-work (preview terms and make a few connections to bring to class). In live lesson group students into breakout rooms for placement & explanation & then share out whole group.
    • Semi-sync: Explain, provide think time (semi-sync) and then move into breakout rooms. Come back and share out
  • Other scaffolds/considerations:
    • Start with fewer terms and fewer hexagons
    • Include images and words in hexagons
    • Ask groups to place terms and then ADD __ (number) of terms themselves
    • Ask students to generate the list of terms related to recent study. Use their​ list for the hexagon webs. 
One thing I didn't do in PLG was explicitly model, through Think Aloud, how I might connect a couple of terms and why. I excluded that in the interest of time with adult learners, but would most certainly begin with that modeling, as well as short burst of time in small groups. 

Here are the hexagon webs and connection explanation from our work. 


Hexagonal Thinking is a strategy that has great appeal across disciplines. In fact, my colleague who turned me onto the podcast teaches science and was excited to think how this could be used with her content. It's worth noting the cross-content value of this strategy, especially in a time when we are trying to use familiar strategies and with routines in order to minimize confusion and maximize clarity and learning.

For those interested in obtaining their own copy of the Hexagonal Thinking templates, visit Spark Creativity here and request a copy for your own use.  This resource includes templates where students can move hexagons and ones where they can move the terms.


Looking forward to how some of you may incorporate this, or variations of this, strategy into your classrooms with students!