Sunday, September 17, 2017

UDL Virtual Tours: Environment Design

The start of the school year is often the time when teachers put into place the new decorating ides they've been thinking about over the summer.  It can be really tempting, especially if you've ever fallen into a Pinterest black hole or two, to add details to make your room look cool. An aesthetically pleasing classroom may look great, but it's important to also think about the users.  A universally designed classroom thinks first about its users--the learners--and the cool factor is an added benefit to all users.


Over the summer I watched a live-streamed video from the UDL-IRN that specifically spoke about the intentional environment designs in a classroom to make the room accessible and comfortable for all learners.  7th Grade ELA teacher Tanya Leon let us into her classroom and explicitly talked through the design decisions she had made.  Given that UDL is a problem-solving, solution-oriented framework, Tanya talked about the barriers she had encountered over the years with her writing workshop.  To minimize this barrier she included some small tables for writing groups and small group conferences.  She also appealed to her students to ask what they would like to see in their classroom.  Some students requested high-top cafe tables because it made them feel older.  This is a great example of a design decision she never would have made without asking for students' feedback.  I imagine students probably take pride in their classroom when they've had a say in how it's designed.  It's certainly not realistic or necessary for teachers to purchase furniture like this on their own.  Finding furniture that friends/family are looking to get rid of and using it in your classroom is one way to work on your design.  DonorsChoose.org is also a way for teachers to receive donations from others to benefit their students.  To listen to and see Tanya's portion of the webinar click the link here. http://tinyurl.com/T-L-classdesign

With the importance of intentional environment design and the help of our school's Technology Specialist (@j3dupuis), I recently put together something I'd been thinking about for a quite a while.   Several years ago at the UDL Summer Institute, I  saw a virtual tour of an empty classroom in a district that had been implementing UDL for a few years. Though the classroom had no students or teacher in it, there was still a lot to learn from the environment and materials themselves.  As visitors "toured" the classroom, we were able to click on magnifying glass shaped hot-spots that provided information about what intentional decisions the teacher had made concerning the physical space and available resources in the classroom.  I loved the idea of these virtual tours  but I wanted to recreate this with classrooms from our school to help SBA staff members see the purposeful environment designs their colleagues make to help them think about their students and their classrooms. A quick conversation with the tech teacher helped us stumble upon Roundme.

SBA UDL Virtual Tours
Take a step inside the a few SBA classrooms and see how they've designed their environments thinking about their learners.


360 Virtual Tour of SBA Classrooms

Grade 6  Classroom


Grade 7  Classroom


Grade 8  Classroom


Roundme  
Roundme is a website and an app that allows you to easily create virtual reality tours from your personal photos.

Signing up for a Roundme account is free and allows you to create up to 15 tours a week.  There is a paid version available with additional capabilities and educators are entitled to a 50% discount if you provide the school's Tax Id. For the purposes I needed, the free account was more than enough.

Creating a Tour
Once you've signed into the site, click Create Tour in the upper right-hand corner. 
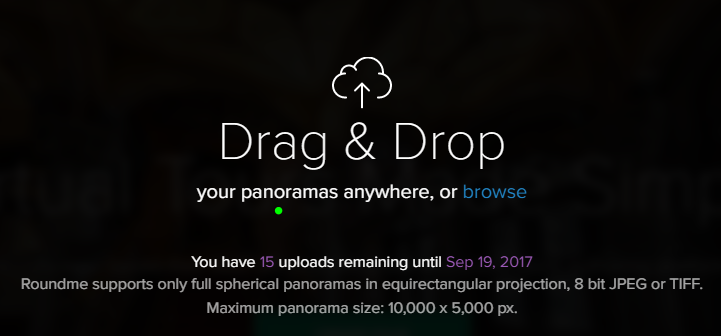
You can upload one of your own photos or you can browse from a bank of photos available. I used the Panoramic setting on my phone to take pictures of the classrooms I wanted and then uploaded these.  While the photo is being uploaded, it is stretched to created a 360 view of the space, so you want to avoid using a photo of a very small space. 

After selecting the photo, click upload and wait as the photo is turned into a moving 360 tour.
 

Your photo will now appear as a moving photo, giving the view a 360 degree view of the space. 

Creating Info Hot-Spots
The hot-spot element was essential for me when creating these virtual tours because I wanted to encourage thinking beyond "looks awesome" toward "oh, that's why he/she put that in her classroom." Creating hot-spots on Roundme proved to be extremely simple!

Click and drag the round white circle with the "i" and place it on the area of the photo you want to highlight. 

Release the hots spot and these boxes will appear.  Title your hot spot whatever you want users to see when they hover off the "i" circle during their tour.
In the description you can write what you'd like visitors to know and/or add a more zoomed in image of the details you want to share more information about.  Click "Create Hotspot" and it's saved.

Saving & Sharing Your Tour
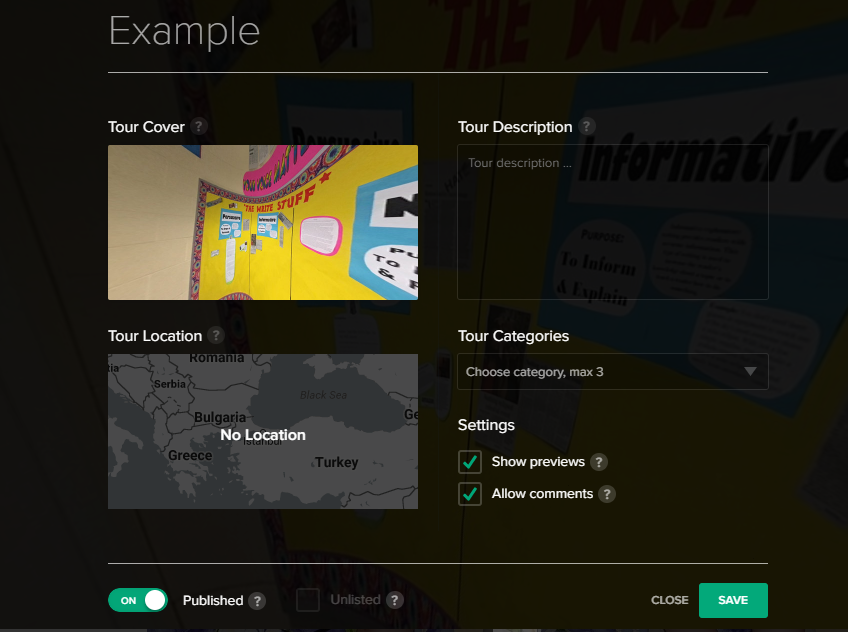
Click on the settings wheel in the upper right-hand corner and enter the details of your tour and click save.
To Publish and Share your tour, switch the green pencil in the upper right-hand corner from right to left and it will turn to a blue and white eye.  When you click on the three white dots, click Share & Export and you will generate a link to invite visitors to your tour.  


Roundme in the Classroom 
Using Roundme to create tours of classrooms prompted me to think about how this tool could be used by students.

One idea I had was a for Getting to Know You purposes: Students take a photo of a space that is important to them and insert hotspots to help teacher and peers gain more insight into their important space.  Possible spaces might be their bedrooms, a park they visit often, a church, a grandparents' house, or many more.  It's an easy way to learn more about students by seeing into their home world--where you will likely never visit.

There are many other ways to use this, I'm sure, and I'd love to hear how others would use Roundme with their students.


Monday, September 4, 2017

Reflections on Write Beside Them


Since becoming a coach a couple years ago, I have had the privilege and pleasure to spend more time in my colleagues' classrooms than I had ever been able to before.  Being welcomed into classrooms from all over the school definitely helps me observe patterns and trends.  One such trend I noticed was the students' enthusiasm and excitement I often witnessed during my visits to ELA theme classes. I saw students writing, reading, and discussing each others' blogs, in Books, Blogs, and Beyond.  Students in Speak Your Mind were presenting animatedly on topics they were passionate about.  And, as seen below, students literally jumping for joy when they published their Journalism podcast in the SBA Freedom student newspaper!


I had seen bits and pieces of this type of enthusiasm in my own classroom, but not on a regular basis, so I wondered: What is so different about writing in theme classes versus ELA class? In and out of PLG we began talking about this idea of "Real World" vs. "School Writing" and trying to connect with our most positive experiences teaching writing.  With this in mind, I set out to read a collection of professional books about writing instruction that would help breathe more "Real World" writing opportunities into school.    


Write Beside Them by Penny Kittle

I began this book mid-school year and honestly had a difficult time getting into it, so I just finished it at the start of the summer.  Kelly Gallagher's Write Like This had hooked me immediately and because I found practical practices for implementation it was a book I read quickly but definitely need to reread.  Whereas I  could pull a chapter or couple pages from Gallagher's book and say I'm going to try "this," I think Kittle's book reads better as a whole book.  It's a mix of theory, personal experience, and specific classroom practice that I appreciated once I'd finished it.  Without necessarily using the terms "Real World" vs "School Writing,"  Write Beside Them certainly focuses on the "personal investment," "choice of topic," and "authentic audiences," we'd been working to infuse into our "school writing."  

Ideas to Consider 

  • Teacher as Writer: I read an excerpt from Gretechen Owocki's The Common Core Writing Book, where she says being a writing teacher who does not write is like being a piano teacher who does not play. Kelly Gallagher believes that the teacher is and must continue to be the strongest writer in the class by writing.  Write Beside Them is no exception as Kittle describes what a big role her own life as a writer plays in her classroom.  She talks about the challenges she found with using literature from her shelves or other published pieces as mentor texts.  Because these pieces were polished and published, she felt her students were missing out on seeing the messy and non-linear process that writing often is.  Instead, she shares messy drafts and unfinished pieces, writes in front of them with her writing projected, and makes her thinking visible and audible as she talks out her decisions. Regardless of how you share your writing with students, for me it comes back to Owocki's point that if we are not practicing the skill and art we're teaching, we will have nothing to share.
  • Organization: A few years ago I watched an interview with Nancie Atwell where she talked about her writing workshop and a time when Don Graves visited her classroom.  Initially she was disappointed when his observation was "You're so organized" because she had wanted him to notice something that felt much more profound to her. She realizes that his comment did get to a central element of the writing workshop and she writes more about that here.  Kittle says, "Organization leads struggling writers to competence." (p.8).  It is the way she intentionally designs structures to organizes notebooks, writing groups, workshop time frames, furniture, reading & writing conferences, and more that provides Kittle's students the conditions to succeed and grow as writers.  
  • Writers Notebook: Of course the idea of a writer's notebook is not groundbreaking, but I love what she says about why students need one: "The notebook is a place for all that bad writing that is essential to uncover good writing." (p.26). Quick Writes, for which Kittle shares many ideas, are the starting point for students' notebook writing.  The three step Quick Write process is to write, reread the writing to find places where you have more to say, take that idea from the quick write and write more.  "Rereading is an essential and often overlooked part of teaching writing."(p.51). This quote strikes me because I realize that in order for students to reread their work so they can write more they must have a large volume of writing as well as topics they care enough about to go deeper.
  • Topics & Choice:  Kittle reflects on an experience she had years ago where she told her students they could write about anything they wanted.  Unsurprisingly, many students responded that they had nothing or didn't know what to write about, which helped her realize that "choice needs to be taught." (p.33).  The teacher's role is not to tell students what to write about, but rather provide students exercises and opportunities that help students figure out their topics themselves. Teachers' must support students affective networks by balancing the demands of the task--writing--and the resources--quick writing & talking with peers--available to students. Quick Writes are one way to help students uncover writing topics and the rereading is a huge part of this process. Kittle cites Lucy Calkins, "Children will never write well if they are accustomed to writing briefly.  Elaboration is one of the very first and most fundamental qualities of good writing," when she emphasizes the importance of rereading your own writing to notice " themes in thinking."  These themes often become the topic for our writing and students need a lot of time to make this happen.  They need time to write, time to talk and flesh out their ideas, time to read, and write again.  
  • Response Groups: "Writers need lots of readers" (p.91).  Kittle's Response Groups are comprised of three students who remain together through a couple units of study.  They begin with a teacher-assigned task to examine a mentor texts together and eventually move on to share their own writing.  I LOVE this idea! Like many of the practices in her book, this reminds me of the way many of my creative writing courses in colleges were organized.  These groups are a much more efficient way to get a students' writing exposed to multiple readers before the teacher reads it.  They are also a beautiful way to foster community and collaboration among students because they are depending on each other to provide timely and thoughtful feedback.  It also makes me rethink the idea of authentic audiences that we've been discussing for the last year.  Although these groups are technically in the classroom, it is still a way to extend a student's audience beyond just the teacher.

This marked-up page looks like most of the pages in my copy of the book, but this one connects the most to our continued struggle with Real World vs School Writing.  We can't ignore the type of writing our students are often asked to do as part of their academic careers, but as Kittle's chapter is aptly titled, we must continue "Seeking Balance" in the types of writing opportunities we offer our students.