Over the summer I watched a live-streamed video from the UDL-IRN that specifically spoke about the intentional environment designs in a classroom to make the room accessible and comfortable for all learners. 7th Grade ELA teacher Tanya Leon let us into her classroom and explicitly talked through the design decisions she had made. Given that UDL is a problem-solving, solution-oriented framework, Tanya talked about the barriers she had encountered over the years with her writing workshop. To minimize this barrier she included some small tables for writing groups and small group conferences. She also appealed to her students to ask what they would like to see in their classroom. Some students requested high-top cafe tables because it made them feel older. This is a great example of a design decision she never would have made without asking for students' feedback. I imagine students probably take pride in their classroom when they've had a say in how it's designed. It's certainly not realistic or necessary for teachers to purchase furniture like this on their own. Finding furniture that friends/family are looking to get rid of and using it in your classroom is one way to work on your design. DonorsChoose.org is also a way for teachers to receive donations from others to benefit their students. To listen to and see Tanya's portion of the webinar click the link here. http://tinyurl.com/T-L-classdesign
With the importance of intentional environment design and the help of our school's Technology Specialist (@j3dupuis), I recently put together something I'd been thinking about for a quite a while. Several years ago at the UDL Summer Institute, I saw a virtual tour of an empty classroom in a district that had been implementing UDL for a few years. Though the classroom had no students or teacher in it, there was still a lot to learn from the environment and materials themselves. As visitors "toured" the classroom, we were able to click on magnifying glass shaped hot-spots that provided information about what intentional decisions the teacher had made concerning the physical space and available resources in the classroom. I loved the idea of these virtual tours but I wanted to recreate this with classrooms from our school to help SBA staff members see the purposeful environment designs their colleagues make to help them think about their students and their classrooms. A quick conversation with the tech teacher helped us stumble upon Roundme.
SBA UDL Virtual Tours
Take a step inside the a few SBA classrooms and see how they've designed their environments thinking about their learners.
360 Virtual Tour of SBA
Classrooms
|
|
Grade 6
Classroom
|
|
Grade 7
Classroom
|
|
Grade 8
Classroom
|
|
Roundme
Roundme is a website and an app that allows you to easily create virtual reality tours from your personal photos.
Signing up for a Roundme account is free and allows you to create up to 15 tours a week. There is a paid version available with additional capabilities and educators are entitled to a 50% discount if you provide the school's Tax Id. For the purposes I needed, the free account was more than enough.
Creating a Tour
Once you've signed into the site, click Create Tour in the upper right-hand corner.
You can upload one of your own photos or you can browse from a bank of photos available. I used the Panoramic setting on my phone to take pictures of the classrooms I wanted and then uploaded these. While the photo is being uploaded, it is stretched to created a 360 view of the space, so you want to avoid using a photo of a very small space.
After selecting the photo, click upload and wait as the photo is turned into a moving 360 tour.
Your photo will now appear as a moving photo, giving the view a 360 degree view of the space.
Creating Info Hot-Spots
The hot-spot element was essential for me when creating these virtual tours because I wanted to encourage thinking beyond "looks awesome" toward "oh, that's why he/she put that in her classroom." Creating hot-spots on Roundme proved to be extremely simple!
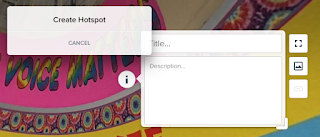
Click and drag the round white circle with the "i" and place it on the area of the photo you want to highlight.
Release the hots spot and these boxes will appear. Title your hot spot whatever you want users to see when they hover off the "i" circle during their tour.
In the description you can write what you'd like visitors to know and/or add a more zoomed in image of the details you want to share more information about. Click "Create Hotspot" and it's saved.
Saving & Sharing Your Tour
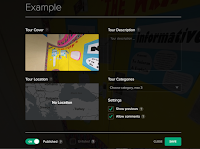
Click on the settings wheel in the upper right-hand corner and enter the details of your tour and click save.
To Publish and Share your tour, switch the green pencil in the upper right-hand corner from right to left and it will turn to a blue and white eye. When you click on the three white dots, click Share & Export and you will generate a link to invite visitors to your tour.

Roundme in the Classroom
Using Roundme to create tours of classrooms prompted me to think about how this tool could be used by students.
One idea I had was a for Getting to Know You purposes: Students take a photo of a space that is important to them and insert hotspots to help teacher and peers gain more insight into their important space. Possible spaces might be their bedrooms, a park they visit often, a church, a grandparents' house, or many more. It's an easy way to learn more about students by seeing into their home world--where you will likely never visit.
There are many other ways to use this, I'm sure, and I'd love to hear how others would use Roundme with their students.


No comments:
Post a Comment